Lawyers Documentation
Thank you for purchasing my theme. If you don't find the answers for your questions in this help file, please feel free to email via my user page contact form . Thanks!
License
When you purchase a theme from Themeforest, the Regular License allows you to use the theme in a single end product. One theme license for one domain ( one theme installation in a single domain )
The billing process and licensing term are fully managed by Envato Ltd. and we don't have any control over this matter.
For more information about licensing check this page https://themeforest.net/licenses/standard?license=regular
FAQ:
Can I use the theme on a test site, then move it to a live site when finished?
Yes, you can use the theme on a test site to build it, then move it to the live site once you're finished. You'll have to remove the theme files from the test site.
Getting Started
If you are new to WordPress here's what you have to do:
Installing WordPress
In order to install the current version of WordPress Theme, please go to https://wordpress.org and download the current version of WordPress. For information on how to install WordPress, please see the WordPress codex page https://codex.wordpress.org/Installing_WordPress .
Installing Theme
You can do it in 2 ways:
- a. Via WordPress Admin: Go to Appearance > Install Themes > Upload and choose lawyers.zip file ((make sure you are not uploading the whole zip file that you've downloaded (including dummy content, documentation) but only the lawyers.zip file). Click Install Now.
- b. Via FTP: Upload lawyers folder into wp-content/themes folder.
- After you've installed the theme make sure to activate it.
Import Demo
If you want your website to look like the live demo, then customize it as you want, follow these steps:
After the theme is activated make sure to install and activate the required and recommended plugins: MT Lawyers, Elementor, ACF, Contact Form 7 plugins . The plugins are necessary for having the features presented in the demo.

Install and activate One Click Demo Import plugin.
Go to Appearance > Import Demo Data and click the Import Demo Data button for one of the website demos.

- A new page will open. Click "Continue & Import" button. Wait until the demo content is imported to your website.
IMPORTANT: After you import the demo content to your website, change the URL from the imported demo to your website. These are the steps you need to take:
Go to Elementor > Tools > Replace URL Tab
In old-url field enter the demo URL - see below and new-url enter your site address. Click Replace URL
- Main Demo URL: https://lawyers.matchthemes.com/
- Consulting Demo URL: https://lawyers.matchthemes.com/consulting/
- Finance Demo URL: https://lawyers.matchthemes.com/finance/
- Resume / CV Demo URL: https://lawyers.matchthemes.com/resume/
- Life Coach URL: https://lawyers.matchthemes.com/life-coach/
- If the menu in the header doesn't appear, go to Appearance > Menus, select "Primary Menu" at the bottom of the page and click Save.

Then go to Appearance > Customize > Headers || Footers and select from the pre-made header and footer sections.
For more info please check the Headers & Footers docs section.
In case the blog posts appear in the main page, instead of the home page, go to Settings > Reading > Your homepage displays, select > A static page and for the Homepage option select the Home page.

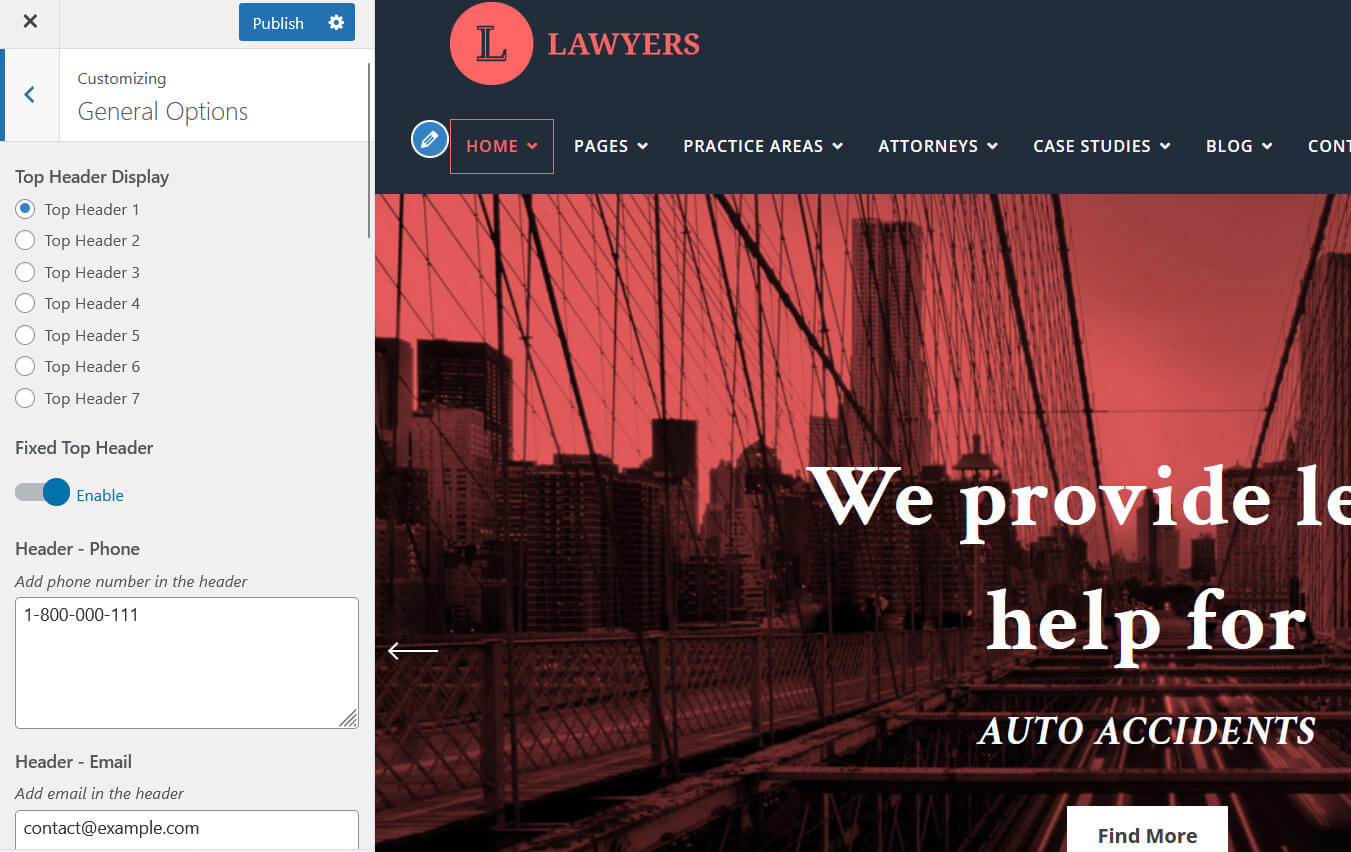
To configure the homepage slider / video go to Appearance > Customize > Home Slider > Home - Slider Items.

The default slider text is this:
<h2>We provide legal<br>help for</h2>
<h4>Auto Accidents</h4>
<a class="btn-white" href="#">Find More</a>
The slider images size from the demo is 1920x1080 px. You can experiment with other sizes too.
To use the Colors and Typography options from Appearance > Customize , go to Elementor > Settings and check Disable Default Colors and Disable Default Fonts options.

The background images are not displayed by default when you import the demo file. The images URLs would have been from my live demo and most of the users forgot to change them. ( this caused my server get very busy with requests ). You'll have to edit the page with Elementor and add the section background image. The images are available in the Media option. Check the example below.

-
Go to Elementor > Tools > Replace URL Tab

-
In old-url field enter the demo URL - see below and new-url enter your site address. Click Replace URL
- Main Demo URL: https://lawyers.matchthemes.com/
- Consulting Demo URL: https://lawyers.matchthemes.com/consulting/
- Finance Demo URL: https://lawyers.matchthemes.com/finance/
- Resume / CV Demo URL: https://lawyers.matchthemes.com/resume/
- Life Coach URL: https://lawyers.matchthemes.com/life-coach/
- Go the General Tab > Regenerate CSS, click Regenerate Files
- Click Save Changes button
After you've installed the theme, you can customize it in Appearance > Customize.
Setup Menu
- Go to Appearance - > Menus tab
- Add new menu, enter Menu Name
- Add Menu Items. Select the pages you've just created and add them to the menu
- Drag & drop the menu items as you like. Check the image below. Than save the menu
- !IMPORTANT: make sure the Theme Locations option is set to Primary Menu.

Pages General
First go to Settings > Permalinks. Select from Common Settings > Post name option. This is for better SEO permalinks.

The theme comes with the following custom Page Templates:
- Default Template - The default page
- Home Elementor Template
- Full Width Template
- Full Screen Template
How to use a template:
- Click Pages > Add New.
- Look for Page Attributes on the right side and click on the "Template" drop-down menu.
- Choose a page template.
- Click the Publish button above.
- Now you can add your new page to your Menu.
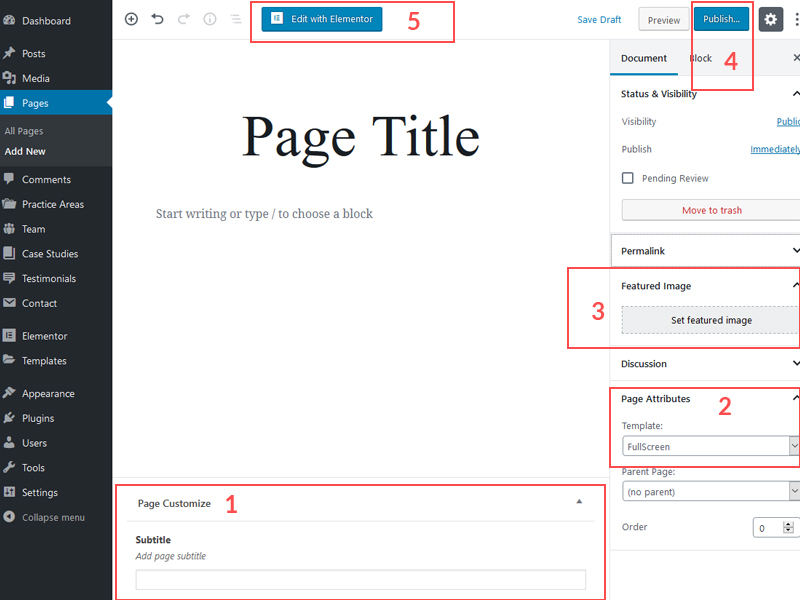
Page Customization Meta Box:
Each page has a customization meta box where you can customize the page title, tagline text.

Setup Pages
Elementor
The theme uses the Elementor page builder plugin. The majority of pages are created with it. To learn more about Elementor and how to use it please check this page: Elementor Docs
1. After the Elementor plugin is installed, go to Elementor > Settings and check Disable Default Colors and Disable Default Fonts option. By doing so you can use the Colors and Typography options from Appearance > Customize
2. If you haven't import the theme demo data and you want to use just the Lawyers Elementor page templates, go to Templates and import the lawyers-elementor-page-templates.zip file from the main archive.
Create a Page with Elementor
- Click Pages > Add New
- Optional add the Featured Image and modify the Page Customization options ( right under the text editor) . Click the Publish button.
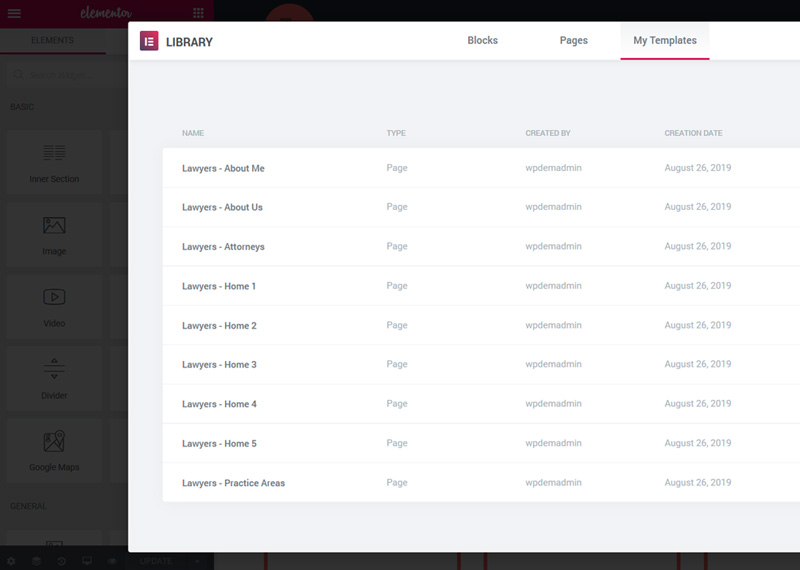
- Click the Edit with Elementor button
- Click Add Template ( the folder icon ) and select from My Templates one of the Lawyers page templates.
- OR click Add New Section and start building your page as you want.
Headers & Footers
First thing, please make sure the required plugins are installed and active: MT Lawyers and Elementor.
Then go to Elementor > Settings and make sure the Post Type > Footer Builder option is checked. Same for Disable Default Colors and Disable Default Fonts options.
To select one of the pre-made header / footer sections go to Appearance > Customize > General Options > Headers or Footers options. Select the ones you want.
For the footer section you can use the footer builder. Go to Footer Builder option. Click Edit with Elementor link or click the "Add New" button to create a new section.
If you create a new footer section, in order to display it, you'll have to select it from Appearance > Customize > Footers > Footer Display option

Homepage
- Click Pages > Add New.
- Look for Page Attributes on the right side and click on the Template drop-down menu. Select the "Home Elementor" template.
- Click Publish.
To configure the homepage slider go to Appearance > Customize > Home Slider > Home - Slider Items ( Note: The recommended size for the slider images is 1920x1080 px. You can experiment with other sizes too. )
The default slider text:
<h2>We provide legal<br>help for</h2>
<h4>Auto Accidents</h4>
<a class="btn-white" href="#">Find More</a>
- Add home content by clicking the Edit with Elementor button
-
! IMPORTANT : Click Settings > Reading and select Front page displays a static page. Select the page you just created as your Front page and click Save Changes.
Practice Areas Page
A. First let's add some practice items
- Click Practice Areas > Add Practice Item
- Add image via the Featured Image or image icon via Item Customization meta box
- Click Publish.

B. To create the practice area page
- Click Pages > Add New.
- Look for Page Attributes on the right side and click on the "Template" drop-down menu. Select "Full Screen"
- Add a featured image
- Click Publish.
- Click the Edit with Elementor button
-
There are 3 practice areas shortcodes:
To show images use this shortcode: [practice_areas_image cols="3" count="12"], cols can be 3 or 4
To show icons use this shortcode: [practice_areas cols="3" count="12"], cols can be 2, 3 or 4
To show icons use this shortcode: [practice_areas_icon_v2 cols="3" count="12"], cols can be 3 or 4
Team Page
- Click Pages > Add New.
- Look for Page Attributes on the right side and click on the "Template" drop-down menu. Select "Full Screen"
- Add a featured image
- Click Publish.
- Click the Edit with Elementor button
-
There is one team shortcode:
Team v1 shortcode: [team cols="3" count="12" text="on"], cols can be 2, 3 or 4
- NOTE: Add a team member by going to Team > Add Team Item
Cases Page
- Click Pages > Add New.
- Look for Page Attributes on the right side and click on the "Template" drop-down menu. Select "Full Screen"
- Add a featured image
- Click Publish.
- Click the Edit with Elementor button
-
There is a case studies shortcode:
Case Studies shortcode: [case_studies filter="on" cols="3" count="12"], cols can be 2, 3 or 4
- NOTE: Add a case item by going to Case Studies > Add New Case Item
Contact Page
- Click Pages > Add New
- Click the Edit with Elementor button
- Click Add Template and select from My Templates one of the Contact page templates.
- Click Publish
- Install and activate the contact 7 plugin ( https://wordpress.org/plugins/contact-form-7/)
Go to Contact > Add New and create a new contact form

Add the following code in the Form option to look like in online demo
<label>Name</label> [text* your-name class:comm-field] <label>Email</label> [email* your-email class:comm-field] <label> Subject</label> [text your-subject class:comm-field] <label> Message</label> [textarea your-message id:msg-contact] [submit id:submit-contact "Send Message"]- Click the Save button. Copy the shortcode and paste it in the contact page.
Blog Page
- Click Pages > Add New.
- Click Publish.
- Now you can add the new page to your menu
-
Now click Settings > Reading and select Front page displays a static page. Select the blog page you just created as your Posts page and click Save Changes.
- To select a blog layout go to Appearance > Customize > General Options > Blog - Articles Layout option
- Click Posts > Add New to create a news post. Make sure when you add a Featured Image for a post to have at least 1200x600px to look like the online demo. You can try other sizes.
Customization
Widget Areas
There are 4 widget areas for this theme. Go to Appearance > Widgets to use them.

Theme Customizer
Lawyers is using the WordPress Live Customizer feature. Go to Appearance > Customize and change site title, colors, upload your logo and more. You'll see real time preview of changes you made to your site.

Shortcodes
Here's the list of available shortcodes:
-
There are 4 practice areas shortcodes:
To show images use this shortcode: [practice_areas_image cols="3" count="12"], cols can be 3 or 4
To show images use this shortcode: [practice_areas_image_v2 cols="3" count="12"], cols can be 2, 3 or 4
To show icons use this shortcode: [practice_areas cols="3" count="12"], cols can be 2, 3 or 4
To show icons use this shortcode: [practice_areas_icon_v2 cols="3" count="12"], cols can be 3 or 4
The count attribute is optional.
-
Team v1 shortcode: [team cols="3" count="12" text="on" name=""], cols can be 2, 3 or 4
Team v2 shortcode: [team_v2 cols="3" count="12" text="on" name=""], cols can be 2, 3 or 4
The count, text, name attributes are optional.
-
Case Studies v1 shortcode: [case_studies filter="on" cols="3" count="12"], cols can be 2, 3 or 4
Case Studies v2 shortcode: [case_studies_v2 filter="on" cols="3" count="12"], cols can be 2, 3 or 4
-
Testimonials shortcode: [testimonials count="5"]
The count attribute is optional.
-
Blog Articles shortcode: [blog_3cols count="3"]
The count attribute is optional.
-
Gallery shortcode: [gallery_grid post_id="" cols="3" count="12"], cols can be 2, 3 or 4
The post_id attribute is required. You'll find the post ID by clicking its title in the Galleries section. The post will open in post editor and you'll see the post ID in your browser's address bar. Check the image below:

Child Theme
Lawyers theme comes with a child theme in the main download package.
A child theme is a theme that inherits the functionality and styling of another theme, called the parent theme.
Child themes are recommended if you modify the theme files code and don't want to lose your customization when updating the theme to a new version.
Change Log
- version 4.6.9
Compatible with WordPress 7.0
[Updated] MT-Lawyers plugin - version 4.6.8
[Updated] theme options
[Updated] MT-Lawyers plugin - version 4.6.7
Compatible with WordPress 6.9
[Updated] js slider library
[Updated] MT-Lawyers plugin - version 4.6.5
Maintenance Update
[Updated] js slider library
[Updated] MT-Lawyers plugin
[Replaced] social icons with svgs
[Fixed] few css styles - version 4.6.4
[NEW] Legal Advisors Site Layout
[NEW] Footer 8
[Updated] MT-Lawyers plugin
[Fixed] few css styles - version 4.6.3
Compatible with WordPress 6.8
[Improved] theme accessibility - added accessible name for buttons, fixed headings order in the footer, added main tag container, added accessible name for social icons.
[Updated] MT-Lawyers plugin
[Updated] X Twitter icon
[Fixed] few css styles - version 4.6.1
[Updated] slider js
[Fixed] practice category filter shortcodes - version 4.6.0
Compatible with WordPress 6.7
[NEW] Lawyers Law Firm Demo 6
[NEW] Footer 7
[Updated] MT-Lawyers plugin
[Updated] case studies v2 shortcode
[Updated] css styles
[Fixed] testimonials shortcode - version 4.5.7
Maintenance update
Compatible with WordPress 6.6
[Updated] MT-Lawyers plugin
[Updated] theme options
[Updated] portfolio shortcodes
[Updated] js slider - version 4.5.6
[NEW] Site Design: Life Coach Demo
[NEW] Footer 6
[Updated] MT-Lawyers plugin
[Updated] theme options
[Updated] style.css file - version 4.5.5
Compatible with WordPress 6.5
[Updated] MT-Lawyers plugin
[Updated] js slider script
[Updated] theme options
[Added] default page appearance tools for WP 6.5 editor
[Fixed] YouTube home video - version 4.5.3
[Updated] MT-Lawyers plugin
[Updated] theme options
[Updated] js swiper
[Fixed] wpml-config file
[Fixed] faq and testimonials styles - version 4.5.2
[Updated] MT-Lawyers plugin
[Updated] js slider
[Added] block support for link-color & border
- version 4.5.0
[NEW] Demo Consulting
[NEW] Demo Finance
[NEW] Demo Resume / CV
[NEW] Footer Builder option
[NEW] 5 Default Footer layouts
[NEW] Header 6
[NEW] Header 7
[Updated] MT Lawyers plugin
[Updated] Home slider
[Updated] Practice Items new option for svg icons - version 4.4.0
[Updated] MT Lawyers plugin
[Updated] demo import - version 4.3.2 [Updated] bundled plugins
- version 4.3.1
[Updated] MT Lawyers plugin - version 4.3.0
[NEW] Home 10
[NEW] Team v2 pages
[NEW] Case Studies v2 pages
[Added] Practice items categories
[Added] Practice items cat attribute filter shortcode
[Updated] Practice items shortcodes to display and optionally filter categories
[Updated] Home Video option to work with youTube / Vimeo URL - version 4.2.7
[Updated] bundled plugins
[Fixed] default top header image option - version 4.2.5
[Added] reorder attributes for the practice and team shortcodes
[Updated] theme options panel
- version 4.2.2
[NEW] Home 8
[NEW] Home 9
[NEW] Footer 1, 2, 4 cols options
[Updated] Bundle plugins
[Fixed] Email icon field - version 4.2.0
[Updated] bundled plugins
[Tweak] small css styles
[Tweak] js code - version 4.1.7
[Added] email social icon
[Updated] ACF plugin
[Removed] Unused files to speed up site loading - version 4.1.6
[Updated] bundled plugins
[Fixed] width and height attributes for the logo img tag - version 4.1.5
[NEW] Homepage 8
[Updated] bundled plugins
[Updated] minor style changes - version 4.1.2
[Updated] theme options
[Updated] bootstrap
[Updated] team shortcode
[Tweak] background color for lazy load images
[Tweak] elements styles - version 4.1.0
[NEW] Home 5, Home 6
[NEW] Headers: 4, 5
[NEW] Practice Image v2 shortcode
[Updated] Bootstrap
[Updated] Bundle plugins
[Updated] theme translation
[Updated] style.css
[Fixed] child theme - version 4.0.5
[Removed] Home Content custom type used in version 3
[Removed] Home widgets
For customers using older Lawyers versions then 4, after the update use Elementor to recreate the home page and other pages. Please check the new docs.
[Updated] Font Awesome
[Updated] demo file
[Fixed] styles for Gutenberg blocks - version 4.0.0
NOTE for customers that use older Lawyers versions ( older than 4.0.0 ): The Home Content custom post type is obsolete and it'll be removed on November 1st, 2019. Starting from version 4.0.0, the theme uses Elementor for creating all the pages. Use one of the Elementor home page templates to recreate your homepage. If you have questions, please send us a private message. Thanks for understanding!
[NEW] All pages are now created with Elementor
[NEW] 5 Homepages
[NEW] Video Homepage option
[NEW] Page templates: Practice Areas, Case Studies, Contact, About Us, About Me, Gallery, FAQ
[NEW] Blog layouts
[NEW] shortcodes
[Update] Bootstrap 4
[Update] Font Awesome 5
[Tweak] Top Header Menus
[Tweak] Mobile Menu [Tweak] css styles - version 3.2.3 [Updated] Bootstrap [Updated] ACF [Updated] Theme Options [Removed] G+ icon
- version 3.1.2 [Updated] compatibility with Gutenberg [Updated] ACF plugin [Updated] Owl Carousel [Updated] style.css file
- version 3.0.0 For existing customers. If you want to update the theme to the latest version, you'll have to add again some of the theme sections, like home slider, logo, contact, about or gallery pages ( in case you use them ). Please check the new docs. Now the homepage uses custom post types. For customers that use old versions of Lawyers, we let for now the old widgetized homepage, but we suggest to move all your home content via the new Home Content option. - [Updated] Theme customizer - all the theme options are now in one place - [Updated] Custom Post Types options: now theme uses the ACF plugin. - [Updated] Homepage: uses custom post type. You have more flexibility to create home sections with custom content. Also you can use shortcodes to easily add blocks of particular content ( practice areas, team, gallery etc. ). - [Updated] About page - [Updated] Contact forms use the contact form 7 plugin - [Updated] Shortcodes for practice areas, team, gallery, blog