
How to increase max upload file size in WordPress is usually the first thing people search when a “file too large” error blocks an important upload. It often happens when trying to upload a high-resolution video, a large plugin ZIP, or heavy WooCommerce product images.
The confusing part is that smaller files upload just fine, so the issue feels random. In reality, the limit usually comes from the server or PHP settings, not WordPress itself, which is why the error message rarely tells the full story.
This can be a real problem for media-heavy websites such as photography portfolios, course platforms, membership sites, and WooCommerce stores that upload large files regularly. If the upload limit is too low, everyday tasks like adding videos, themes, plugins, or product images become frustrating.
In this guide, you’ll learn how to increase max upload file size in WordPress using the safest methods first, including hosting settings, wp-config.php, .htaccess, and Multisite options. You’ll also see how to check the current WordPress upload limit before making changes.
How to Check the Current WordPress Upload Limit
Before changing anything, it helps to see the current upload cap. From the dashboard, go to Media → Add New, then look under the uploader for a line showing “Maximum upload file size: X MB”.
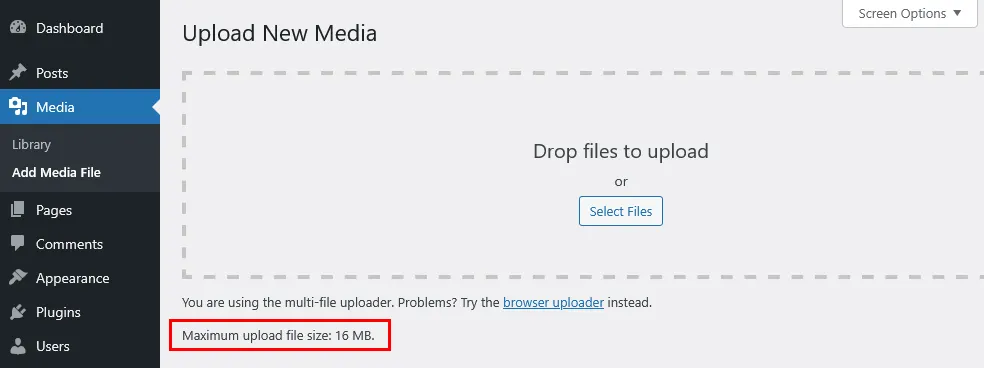
Another option is Tools → Site Health → Info, then open the Media Handling section to see “Max size of an uploaded file”. This quick check shows if changes actually worked later when testing the new max upload file size in WordPress.

Method 1: Ask the Hosting Provider
For those who are new to WordPress or don’t want to dive into technical tweaks, reaching out to the hosting provider is often the smartest move. Hosting support teams can quickly check what the current upload limit is set to on the server side. They can also increase this limit if the hosting plan allows it, or explain the maximum upload size permitted under the plan. This option avoids dealing with files or code and is usually the fastest way to get past upload errors.
Managed WordPress hosts tend to be flexible in adjusting upload limits for their customers within reasonable bounds. However, if really large files need to be uploaded frequently, simply raising the WordPress max upload file size might not be the best answer. In those cases, the host often recommends alternatives like using SFTP to upload files directly to the server, connecting via SSH, or offloading heavy media to Cloudflare free CDN. These options reduce strain on the website and keep it running smoothly without hitting upload size ceilings repeatedly.
Method 2: Increase Max Upload File Size with wp-config.php
If you’re comfortable editing WordPress files, you can try increasing the upload limit through wp-config.php. This file sits in the root folder of your site and can be accessed through FTP or your hosting file manager. Before making any changes, create a backup first.

Drop these lines near the end, before the “That’s all” part.
@ini_set('upload_max_filesize', '128M');
@ini_set('post_max_size', '128M');
@ini_set('memory_limit', '256M');
@ini_set('max_execution_time', '300');
@ini_set('max_input_time', '300');
Save and upload. Clear the site cache. Check Site Health > Info to see the new limit. This beats messing with theme files since updates won’t wipe it out.
Method 3: Change Max Upload File Size via .htaccess
If your site runs on Apache, grab the .htaccess file from the main WordPress folder. Get there with FTP or the host’s file tool. Turn on hidden files if it does not show up. Make a copy first. Open it in a basic text editor. Paste these lines at the very end.
php_value upload_max_filesize 128M
php_value post_max_size 128M
php_value memory_limit 256M
php_value max_execution_time 300
php_value max_input_time 300
Save the file and upload it back to the server. Then reload your site and go to Media → Add New to check whether the new upload limit appears.
If your site suddenly shows a 500 Internal Server Error, your hosting setup likely does not allow PHP values in .htaccess. Remove the lines you added right away to restore the site. This method works only on some Apache-based hosting environments.
Method 4: Increase Max Upload File Size from Hosting Control Panel
If your host uses a cPanel‑style control panel, boosting upload limits is often just a few clicks away. Log into your hosting account and open tools like “MultiPHP INI Editor” or “PHP Options.”

There, you can change settings like upload_max_filesize, post_max_size, and memory_limit without needing to edit files manually. Just find the relevant fields, enter your desired file size limits, and save the changes.
This method offers a safer path for users without coding experience because it skips messing with core site files. Once updates are saved, head back to WordPress in Media → Add New and check if the upload limit reflects the new size. Keep in mind that the max size you can set here might still be overwritten by your hosting plan’s overall limits.
Method 5: Increase Max Upload File Size in WordPress Multisite
When managing a WordPress Multisite network, there’s an extra control at the network level that sets the max upload file size for all sites. Network admins can jump into the Network Admin dashboard.
From there, go to Settings → Network Settings, then scroll down until you find the Max upload file size field.

Simply enter the value you want, keeping in mind that it’s measured in kilobytes (so 50000 means 50 MB).
Save your changes, and this stops individual subsites from sticking with low upload limits by default.
It’s important to remember that this setting cannot override the web server or PHP upload limit. If the server or PHP limits are set lower, word from the hosting side matters more.
Best Practices for Uploading Large Files in WordPress
Even after you increase the WordPress upload limit, uploading very large files can still hurt performance. Heavy media files use more server memory, take longer to process, and can slow down both the admin area and the front end. A better long-term approach is to reduce file sizes before upload whenever possible.
Start by optimizing images with free tools like TinyPNG before they hit WordPress. Plugins such as Smush or Imagify then squeeze them more right in the media library. This cuts file weights without losing much quality.
Avoid putting large videos or backup files directly into your WordPress uploads folder. Put them on YouTube, Vimeo, or cloud spots like Amazon S3 instead. Link or embed from there to save space and boost delivery speed. A CDN like Cloudflare spreads heavy assets worldwide fast.
Final Thoughts on Increasing Max Upload File Size in WordPress
Increasing the max upload file size in WordPress is usually a simple fix once you know where the real limit is set. For most site owners, the safest option is to start with the hosting provider or hosting control panel. More advanced users can also try wp-config.php, .htaccess, or Multisite settings depending on the setup.
The best long-term approach is not just raising the upload limit, but also optimizing large files before upload and using external storage or video platforms when needed. That keeps your site faster, cleaner, and easier to manage as it grows.
Related WordPress Guides
If you’re working on performance and media handling, these articles may help next:
How to install Cloudflare free CDN on WordPress


&media=https://matchthemes.com/wp-content/uploads/2025/11/how-to-increase-max-upload-file-size-wordpress.webp)