
Creating a photography website is one of the best ways to showcase your work, build your brand, and attract new clients. If you’re a photographer looking to build a WordPress site, you’re in the right place. At MatchThemes, we offer a range of photography themes designed for clean portfolios, fast loading, and easy customization.
This guide walks you through how to build a photography website that’s easy to navigate and ready for clients. From choosing a WordPress photography theme to setting up galleries and a portfolio structure, you’ll learn the essentials for a site that looks great and helps visitors find what they need quickly.
So, if you’re ready to take your photography business online, keep reading. By the end of this article, you’ll have a fully functional portfolio site that reflects your style and helps you connect with your audience. Let’s get started!
Table of Contents


How to Create a WordPress Photography Website
Building a WordPress photography website involves several steps, from domain registration to theme customization. Please follow the steps below:
Choose a WordPress Hosting
Choosing the right WordPress hosting is critical for the performance and security of your site. When selecting a hosting provider, prioritize speed, reliability, and customer support. Your website’s speed is crucial because high-resolution images can slow down loading times. Look for hosts that offer solid-state drives (SSDs), content delivery networks (CDNs), and server-level caching to keep your site running smoothly.
Consider hosting plans that provide automatic backups and strong security features to protect your work. Managed WordPress hosting is often a good choice for photographers, as it handles updates, backups, and optimizations for you, allowing you to focus on your content. Providers like Bluehost, SiteGround, and WP Engine are popular options known for their excellent performance and support.

As your portfolio grows, you may need more resources or bandwidth. Opting for a host that offers easy upgrades can save you headaches down the line. By choosing the right hosting from the start, you’ll set a strong foundation for your photography website to thrive.
Tip for photographers: Use modern formats like WebP (and AVIF when supported), lazy-load gallery images, and keep your homepage hero image reasonably sized. This improves load time and overall page experience.
Install WordPress
Many hosting providers offer a one-click setup, making it quick and easy to get WordPress installed. After accessing your hosting account, navigate to the control panel. Look for the WordPress installation option, usually found under sections labeled “Software” or “Applications,” and sometimes called “Quick Install” or “Install WordPress.” Simply click the button to start, and follow the on-screen prompts to connect WordPress to your domain.
Choose a Photography Theme
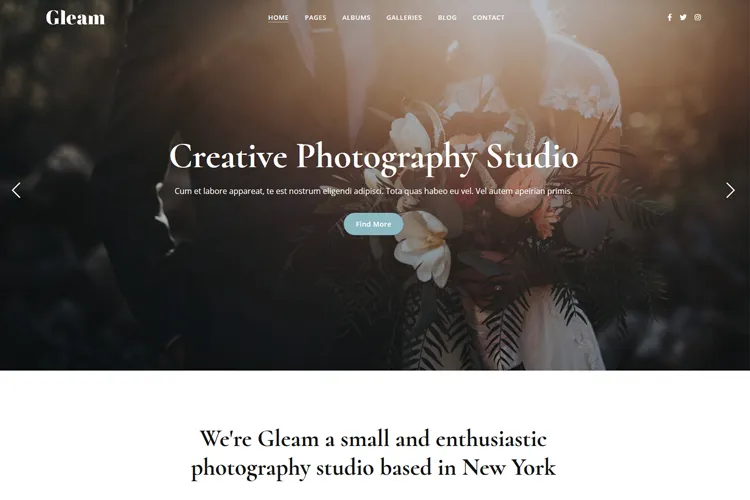
Choosing the right WordPress theme for your photography website helps your images look their best and keeps navigation simple for visitors. If you want a photographer-focused design, look for features like full-screen hero sections, flexible gallery layouts, and clean portfolio pages. Gleam works well for modern, editorial-style portfolios, while Tilia is tailored for wedding photographers who want elegant galleries and storytelling layouts.

Our themes are built for image-first websites, with a balanced feature set so your portfolio stays clean and easy to browse. You can update your logo, colors, and fonts through the WordPress Customizer, and Elementor support makes it simple to arrange sections visually. They’re responsive by default, so galleries and portfolios look great on phones, tablets, and desktop screens.
Style the Theme to Match Your Business Brand
Styling your WordPress theme to align with your business brand is crucial for creating a professional photography website. Start by ensuring that your theme reflects the personality of your brand. If your photography style is bold and vibrant, choose colors and fonts that convey that energy. If your work is more subtle and elegant, opt for a minimalist design with a softer color palette.
Let’s take for example the Gleam theme. Install and activate it. To easily customize it, we recommend to import the demo content. After all the demo pages are imported, select the ones you want to use for your website and start customizing them. You can choose from 20 pre-made homepages, 25 portfolio albums and 8 style photo galleries. With the help of Elementor visual page builder the site customization will be easy to do.
Don’t forget to use consistent imagery and graphics that complement your work. If your photography is the star of your website, ensure that the design elements don’t overshadow your images but rather enhance them.
Let’s dive into the essential page elements your photography site needs to include, providing you with a handy reference as you build your website.
Photography Home page
When building a website on WordPress, it’s crucial to include certain page elements to create a compelling and functional site. The first essential page is the home page.

Your photography website’s home page serves as the digital storefront of your brand. It’s a powerful tool to captivate and engage visitors from the moment they arrive. Crafting this page with care is essential, as it sets the tone for your entire online portfolio.
Usually, the primary element is a featured image, slideshow or short video background that highlights your best work. This immediately showcases your style and invites visitors to delve deeper. It’s a way to set the tone and give people a glimpse of what you offer.
Next, include a brief introduction or tagline that tells visitors who you are and what you do. This doesn’t need to be lengthy – just a few lines that convey your brand and what sets you apart. Pair this with a call-to-action (CTA) button that directs visitors to view your portfolio, book a session, or contact you.
Navigation is another key aspect. Easy-to-find links to your portfolio, about page, and contact page ensure visitors can effortlessly explore your site. Optionally consider adding testimonials or client logos to build trust and credibility.
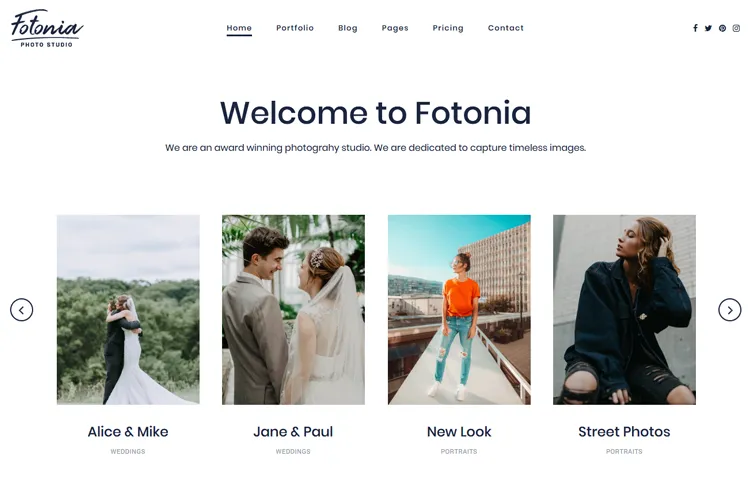
Gallery page
A gallery page is the heart of any portfolio website, as it showcases your work for a particular event or photo session. This page is where visitors get to see your work up close, so it’s vital to make a strong impact. A well-crafted image gallery page not only highlights your best photos but also makes it easy for users to navigate through your gallery.

When designing your gallery page, consider using a clean layout that emphasizes your images. Grid or masonry layouts are popular choices, as they display multiple photos at once without overwhelming the viewer.
Our photo themes include for each gallery a lightbox functionality so that images can be viewed in larger formats without leaving the page. This enhances the user experience by allowing them to fully appreciate the details in your work.
For better visibility in Google Images, follow Google’s image SEO best practices . Use descriptive file names, helpful alt text, and keep image sizes optimized for fast loading.
Portfolio page
The portfolio page is where all your created galleries are present. You can consider it as a highlight for all the galleries. A successful portfolio page should be clean and focused, letting your photos take center stage.
Use a simple, elegant layout that allows your images to shine without distraction. Consider organizing your work into categories or filters, such as portraits, landscapes, or events, to help users easily find the type of photography they’re interested in.

Another key element is portfolio descriptions or captions. Briefly describe each project to give context and showcase your expertise. Additionally, include a call to action at the bottom of the page, encouraging visitors to contact you for bookings or inquiries.
About page
The “About” page on your photography website is where visitors connect with you personally, learning more about the artist behind the lens. It’s a chance to share your story, explain your photography journey, and convey what makes your work distinctive.
Start by introducing yourself, highlighting your background in photography, and mentioning any relevant experience. Let your personality shine through, as this helps build trust with potential clients. A brief narrative about why you chose photography and what inspires your work can add a personal touch, making you more relatable.

Next, consider including a professional headshot or a behind-the-scenes photo of you at work. Visuals like these help visitors put a face to the name, further establishing trust.
It’s also a good idea to explain your approach or philosophy towards photography, giving visitors insight into how you work. This might include your preferred techniques, the types of projects you love, or what you aim to capture in your images.
Finally, add a call to action encouraging visitors to reach out or follow you on social media. Make it easy for them to get in touch by providing a link to your contact page or listing your email address.
Contact page
The contact page on your photography website is crucial for converting visitors into clients. It’s where potential customers can easily reach out to you for inquiries, bookings, or collaborations. A well-designed contact page should be straightforward and inviting, making it as easy as possible for people to get in touch.

Start by including a simple contact form that asks for essential details like name, email, and message. Avoid overwhelming visitors with too many fields—just gather the information you need to respond effectively. If you prefer phone calls, include your phone number as well, along with the best times to reach you.
Next, provide your email address for those who might prefer to contact you directly. Adding a physical address can also be beneficial, especially if you have a studio or are open to in-person meetings.
Consider embedding a Google Map if you have a physical location. This helps clients easily find you and adds a professional touch to your site.
Finally, social media links are important for connecting with your audience outside your website. Make these links accessible, allowing visitors to follow or share your work with a click.
Summary
We hope this guide has made it easier to build your photography website using WordPress. With the right theme and a few essential plugins, you can simplify your workflow and create a faster, smoother experience for visitors.
Whether you’re showcasing your work, attracting clients, or even selling your photos, your website will be a powerful tool in growing your photography business. Now that you have all the steps, it’s time to start building and share your work with the world!
FAQ
- What are the best WordPress themes for photography websites?
Some of our most popular photography themes are Gleam, Tilia, and Fotonia. Gleam is a strong all-round choice for photographers who want a modern portfolio with bold visuals. Tilia is designed for wedding work, with layouts that suit galleries and storytelling pages. Fotonia keeps things minimal, which is ideal if you want visitors focused on the images with less on-screen clutter. - How can I make my photography website load faster?
To improve your site’s loading speed, optimize images , use a fast, lightweight theme like Gleam or Tilia and a caching plugin like WP Super Cache. Minimize the use of heavy plugins and external scripts. Hosting your site on a reliable server with a CDN (Content Delivery Network) can also significantly boost loading times. - Is it necessary to use a page builder for my WordPress site?
While not strictly necessary, using a page builder like Elementor can greatly simplify the process of designing a custom photo site. Page builders offer drag-and-drop functionality, allowing you to create visually appealing layouts without coding. - How can I optimize images for my WordPress photography website?
Optimizing images involves reducing their file size without sacrificing quality to improve page load times. Use image optimization plugins to compress images automatically. Additionally, saving images in formats like JPEG for photographs or PNG for images with transparent backgrounds helps maintain quality while reducing file size. - How do I sell my photos through my WordPress website?
You can sell photos through your WordPress site using plugins like WooCommerce. This allows you to set up an online store, manage products, and accept payments. - How can I prevent unauthorized use of my photographs?
You can install an image protection plugin. These plugins disable right-clicking and keyboard shortcuts that allow users to download your images. However, keep in mind that this method isn’t foolproof, as more tech-savvy users can still bypass these restrictions. Another way to protect your photographs is to add a watermark to them.
