
Want to make your WordPress website available in more than one language? In this step-by-step tutorial, you’ll learn how to create a multilingual WordPress site with Polylang.
Polylang is one of the most popular WordPress translation plugins, and it makes it easy to add multiple languages to your site without creating a second website.
A multilingual site can help you reach more visitors, improve user experience, and support international SEO by making your content accessible in different languages.
In this guide, I’ll show you how to install Polylang, add languages, translate your content, and create a language switcher for your visitors.
What Is Polylang and Why Use It for a Multilingual WordPress Site?
Polylang is one of the most popular WordPress translation plugins for building a multilingual WordPress site.
It helps you add multiple languages to WordPress, translate posts and pages, and create a language switcher without needing advanced technical skills.
Here’s why Polylang is a game-changer:
- It’s free to use for basic features, so you don’t need to break the bank.
- It supports manual translations, giving you full control over the quality of your content.
- You can translate just about everything – posts, pages, categories, tags, menus, and even widgets.
Let’s say you’re running a blog in English but want to connect with Spanish-speaking readers. Polylang lets you create Spanish versions of your posts without needing a second website.
And what about your visitors? Polylang adds a language switcher to your site so users can easily pick their preferred language. You can display this as a dropdown menu, flags, or text links – whatever works best for your design.
The best part? You don’t need coding skills to use it. Just install the plugin, set up your languages, and start translating.
If you want an easy way to create a multilingual WordPress site, Polylang is a beginner-friendly solution worth considering.
How to Set Up a Multilingual WordPress Site With Polylang
Polylang makes it simple to translate your WordPress content into multiple languages and manage language-specific versions of your posts, pages, menus, and categories.
Here’s what makes Polylang stand out:
- It’s free for most features, including translating posts, pages, categories, tags, and menus.
- It works seamlessly with SEO plugins like Yoast SEO, helping your site rank better in different countries.
- You can add as many languages as you want – there’s no limit.
If you need advanced features such as WooCommerce support or more advanced multilingual functionality, you can explore the premium version of Polylang and its WooCommerce add-on integration.
For this guide, we’ll stick to the free version of Polylang. It’s packed with everything you need to create a professional multilingual website without any coding skills.
Let’s get started with Polylang and make your content accessible to the world!
Step 1: Install and Activate Polylang
First things first – install the plugin.
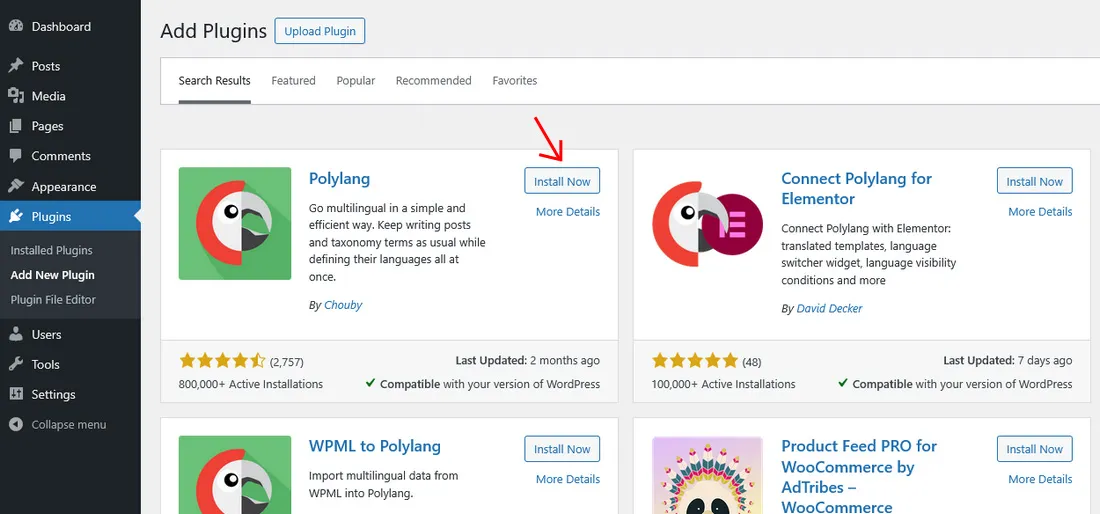
- Go to your WordPress dashboard.
- Navigate to Plugins > Add New and search for “Polylang.”
- Click Install Now and then activate it.
Boom! You’re ready to roll.
After activating Polylang, the configuration wizard should pop up automatically. If it doesn’t, no worries – simply head to your WordPress dashboard. Click on Languages in the sidebar and select Setup Wizard.
This wizard guides you through the setup step by step, making the process smooth and straightforward. It helps you choose your default language, add new ones, and even configure URL settings.
A: Choose Your Default Language
Select your site’s primary language from the list. This language will be the base for all translations.
B: Add Additional Languages
Choose the extra languages you want to support. Pick each language’s name, locale, and flag icon for clear identification.

C: Translate Media
During the Media step, you can set up Polylang to translate media-related strings like titles and alt text.
Simply toggle the feature on to activate translations for your media files, then hit Continue.

D: Assign Default Language
During the Content step, you set your site’s default language. Choose your preferred language from the dropdown menu and click Continue.

E: Setup Homepage
For your site to function correctly, every available language must have a translated version of this page. Every language you support needs its own version of the homepage.
Once the pages are created, it’s up to you to fill in the translated content for each language-specific homepage.

Step 2: Translate Your Posts and Pages
Now it’s time to translate your WordPress content and create language-specific versions of your posts and pages.
Here’s how to do it step by step:
Translating Posts and Pages
Open any post or page in your WordPress dashboard and look for the Languages panel in the editor. Create your original content in the default language first, then use the language options to add translated versions.
Next, click the “+” icon next to the language you want to add, such as French, Spanish, or German.

Here, you can begin translating your content into your chosen language. When you’re finished, save your work and close the post.
Repeat this process for all posts and pages you want to translate.
Translate Theme Strings
Use Languages > Translations to translate strings that are not tied to a specific post or page. This includes interface text such as buttons, menu labels, widget titles, and other theme or plugin strings. If your site contains many translatable strings, use the filter tool to find them faster.

Translate Categories and Tags
- Go to Posts > Categories or Posts > Tags in your dashboard.
- Add a category or tag in your default language first.
- Click the “+” icon for each additional language and input the translations.
Step 3: Add a Language Switcher
A language switcher helps visitors choose their preferred language and makes your multilingual WordPress site easier to use.
Here’s how to add one using Polylang in the site’s menu:
1. Go to Appearance > Menus in your WordPress dashboard.
Look for the Language Switcher option on the left side and add it to your menu. If you don’t see it, open Screen Options and enable it first.

2. Customize the switcher:
Choose whether to display it as a dropdown, flags, or text links. Decide if you want to show all languages or hide the current one. Add a title (optional) to make it clear for users.
Once you’ve set it up, click Save Menu to apply the changes.
Once added, visitors can switch between language versions quickly, which improves navigation and overall user experience.
By following these steps, you’ll ensure that every part of your site is accessible in multiple languages, making it a true multilingual site!
Why You Need a Multilingual WordPress Site
Let’s be real – if your website only speaks one language, you’re missing out. Big time.
Here’s why having a multilingual site is a game-changer:
1. Reach More People
Not everyone browsing the internet speaks English. In fact, over half of internet users speak other languages. By offering content in multiple languages, you can connect with audiences you’d otherwise never reach.
For example, if you’re running an online store in the US, adding Spanish translations could help you tap into a massive Spanish-speaking market.
2. Build Trust with Visitors
People feel more comfortable when they can browse a site in their own language. It shows that you care enough to make their experience better. A multilingual website builds trust and credibility, which can lead to higher engagement and even more sales.
3. Boost Your SEO
A multilingual WordPress site can improve your visibility in search results by making your content available in the languages your audience actually uses. To help Google understand your localized pages correctly, each language version should have its own URL, and multilingual sites should use hreflang annotations where possible.
Polylang can help you organize translated content, but you should also make sure your SEO plugin and site setup support multilingual indexing, translated slugs where appropriate, and proper canonical and hreflang signals.
Final Thoughts on Creating a Multilingual WordPress Site With Polylang
Creating a multilingual WordPress site with Polylang is easier than it looks. Once you choose your languages, translate your main content, and add a language switcher, you’ll have a site that is easier for international visitors to use.
Start by translating your most important pages first, such as your homepage, services, contact page, and top blog posts. Then expand your translated content over time while keeping quality and consistency in mind.
With the right multilingual setup, your site can reach a wider audience, provide a better user experience, and build stronger visibility in international search results.

